There is nothing more frustrating than setting up a beautiful balcony drip irrigation system, looking forward to effortless watering, and then walking out a few weeks later to find half your emitters dead and your favorite tomato plant wilting.
When your lines clog, water distribution goes completely out the window. Some plants drown while others bone-dry. Most people assume the immediate fix is buying a commercial water purifier or a heavy-duty reverse osmosis (RO) system. But here is the catch: ultra-purified RO water strips out calcium, magnesium, and critical trace minerals that your plants desperately crave. You end up having to buy expensive synthetic supplements to add back what you artificially removed.
The sweet spot? A DIY high-mineral filter system. This setup catches the rust, silt, sludge, and organic gunk that cause clogs, but lets the plant-boosting minerals flow straight to your containers. It’s cheap, highly effective, and easy to build right on your balcony.
Why Water Quality Can Make or Break Your Balcony Garden
My Awakening with Drip Systems: “When I first put together my balcony drip lines, I figured water was just water. As long as the timer clicked on and the soil got wet, my plants would be fine. I learned the hard way. Within two months, tiny mineral scales and floating rust flakes choked out my 2GPH drip heads. My chili peppers stalled, my basil got spotty, and I was spending my weekends poking sewing needles into plastic emitters to clear the blockages.”
Balcony container gardening is unique because your plants have access to a very limited volume of soil. If your water source is packed with chemical additives like chlorine, or heavy debris like rooftop dust, it quickly builds up inside the pots. Let’s break down the typical water sources urban gardeners rely on, and why they cause trouble:
- Municipal Tap Water: Readily available and reliable, but it is heavily treated with chlorine and chloramines. This chemical sanitizer is great for humans, but it can harm beneficial soil microbiology. Tap water also fluctuates wildly in hardness depending on your city’s infrastructure, leading to white crusty build-ups.
- Borewell / Ground Water: A literal goldmine for natural minerals like calcium and magnesium. However, unfiltered borewell water is notorious for high iron content and extreme hardness. This will form a rock-hard scale inside your drip lines that completely snaps emitters shut over time.
- Stored Rainwater: Soft, natural, and completely free of chemicals. The downside? Stored water sits stagnant. Unless it is filtered, it becomes a breeding ground for mosquitoes, algae, and organic sludge that instantly creates thick blankets of slime inside your microtubing.
- Rooftop Harvested Water: An excellent sustainable choice, but as it sheets off your roof, it carries bird droppings, urban dust, atmospheric pollution, and disintegrating roof tile particles straight into your reservoir.
What High-Mineral Filtration Really Means
It is important to understand that we are not trying to create pure, laboratory-grade drinking water. Standard home water filters are designed to strip out almost everything, which results in “hungry” water that lacks nutritional value for plants.
A high-mineral irrigation filter system uses selective structural layers. It acts like a progressive security checkpoint: it physically traps floating dirt, rust flakes, organic debris, and chemical chlorine, but allows dissolved, beneficial minerals to slip right through. This ensures your plants get a mineral-rich diet while your lines stay flawlessly clear.
Your DIY Shopping List: Components & Costs
You do not need an engineering degree or a massive budget to build this. Most of these components can be picked up at a local hardware store or ordered online for a few dollars. Here is exactly what you need:
| Component | What It Does | Approx. Cost |
| 1. Pre-Filter Housing | A 20-liter (5-gallon) food-grade plastic bucket with a tight lid. Serves as the main filter chamber. | Rs 400 – 800 |
| 2. PVC Bulkhead Fittings | Two 1/2-inch or 3/4-inch fittings with rubber washers to create watertight inlet and outlet ports. | Rs 400 – 600 |
| 3. Coarse Gravel Base | Thoroughly washed multi-purpose gravel to trap large debris and stabilize the bottom layer. | Rs 300 (or free if upcycled) |
| 4. Activated Carbon | 1–2 kg of premium activated charcoal granules packed in a fine mesh bag to neutralize chlorine. | Rs 400 – 1200 |
| 5. Mineral Media | 10–15 cm layer of mixed Zeolite, crushed volcanic lava stone, or mineral ceramic balls. | Rs 1000 – 1500 |
| 6. Inline Mesh Filter | A dedicated 120-mesh (130-micron) disc or screen filter placed right before the drip line starts. | Rs 600 – 900 |
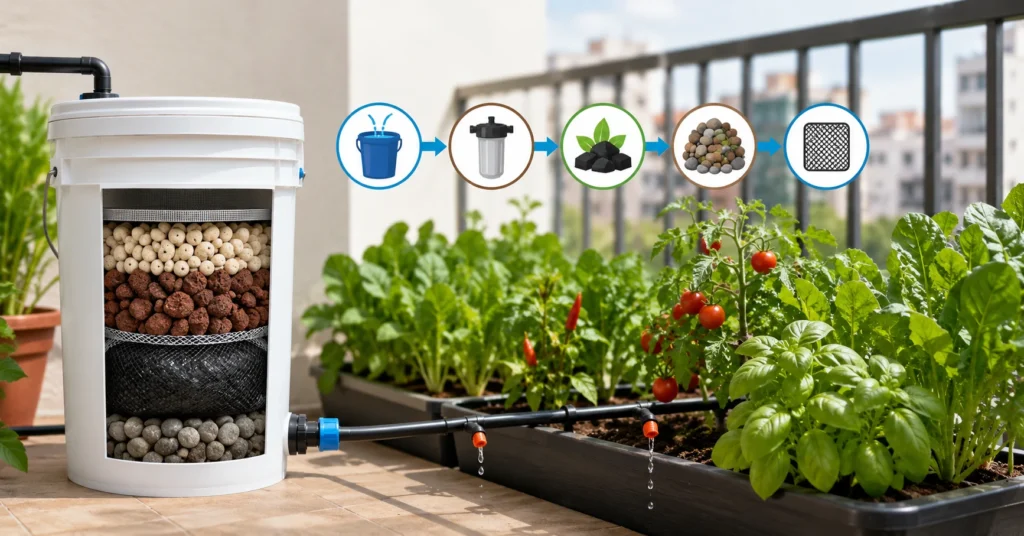
The Blueprint: Recommended System Layout
To make the filtration process highly efficient without dropping your water pressure, organize the stages so that water travels from the roughest media down to the finest barrier. Follow this exact flow layout:
[Water Source] ➔ [Pre-Filter Bucket Input] ➔ [Gravel Base] ➔ [Activated Carbon Bag] ➔ [Mineral Retention Chamber] ➔ [120-Mesh Screen Filter] ➔ [Drip Main Line] ➔ [Emitters]
Step-by-Step Construction Guide
Step 1: Prep the Main Bucket Housing
Grab your 20-liter plastic bucket. Using a spade bit or a step-drill, bore two holes. Make the Inlet Hole about 5 cm below the top rim of the bucket, and the Outlet Hole about 5 cm above the absolute bottom base. Insert your PVC bulkhead fittings into both holes, ensuring the thick rubber washers sit tightly against the inside wall to prevent leaks. Spin the locknuts tight.
Step 2: Lay the Coarse Gravel Foundation
Pour roughly 5 cm (2 inches) of thoroughly washed coarse gravel into the bottom of the bucket. This keeps your fine media from sinking down and blocking the lower outlet hole, while acting as a primary mechanical trap for large, heavy sediment flakes.
Pro-Tip from Experience: Wash your gravel in an external bucket 3 to 4 times before adding it to the system. Brand new gravel is coated in fine rock dust that will turn your first run of water into a muddy slurry, instantly clogging your system before you even begin!
Step 3: Pack the Activated Carbon Layer
Pour your activated charcoal granules into a fine mesh media bag (zippered laundry mesh bags work beautifully for this). Zip it up and place it directly flat on top of your gravel layer. This carbon layer absorbs harsh chemical chlorine and odor compounds, ensuring the water doesn’t shock delicate container root zones or kill off the living microbiology in organic potting soils.
Step 4: Stack the Mineral Retention Media
This is where the magic happens. On top of the carbon bag, build a 10 to 15 cm deep layer of mixed Zeolite and crushed lava rock. Because these stone media are incredibly porous, they provide a massive surface area that traps microscopic suspended solids. More importantly, they help naturally buffer the water’s pH and stabilize beneficial mineral release, so your plants get balanced nutrition with every watering cycle.
Step 5: Secure the Final Screen Barrier
Before closing up the system, install a fine mesh screen directly on the interior side of the lower outlet bulkhead fitting. This serves as your final insurance policy, stopping any loose bits of carbon or tiny gravel dust from migrating out of the bucket and into your main irrigation lines.
Step 6: Hook Up the Drip Network & Test
Snap the lid securely onto your filter bucket to block out sunlight (this is critical to keep algae from growing inside the bucket). Connect your main water source line to the top inlet, and run a line from the bottom outlet directly into your inline 120-mesh screen filter. From there, hook it directly to your balcony drip microtubing, pressure regulators, and emitters. Turn the water on slowly, check all your bulkheads for leaks, and watch your emitters drip beautifully clean water!
Real-World Case Study: The 100 Sq. Ft. Veggie Balcony
To see how this works in real life, let’s look at a typical urban grower cultivating a high-demand vegetable mix: heavy-feeding beefsteak tomatoes, fiery chili peppers, crisp spinach, and sweet Italian basil on a 100-square-foot sunny balcony.
By connecting a 50-liter gravity-fed main water tank to this DIY high-mineral filter bucket and running lines to 8 multi-point drip heads, the gardener completely eliminates the classic “mid-season emitter fail.” Instead of leaves turning a sickly pale yellow from chlorine exposure or localized drought, the plants maintain a rich, deep-green foliage profile and exhibit explosive fruit set, all while operating on a simple, automated watering timer that requires zero daily troubleshooting.
The Golden Rules of Maintenance: Preventing Future Clogs
Even the most perfect DIY system isn’t completely “set-and-forget.” If you want your system to run flawlessly for years, build these quick routines into your calendar:
- Weekly Quick Checks: Walk your balcony line once a week. Do a quick visual scan to ensure every single emitter is actively dripping and no lines have kicked loose from their stakes.
- Bi-Weekly Mesh Flush: Twist open your inline 120-mesh filter cap every two weeks, pull out the internal screen element, and rinse it under a tap to remove trapped silt. It takes 60 seconds and saves hours of headaches.
- Monthly Main Line Flush: Open up the end-caps or plugs at the very end of your drip tubing lines once a month. Let the water run wide open for 30 seconds to flush out any microscopic biofilms or fine sediment settling inside the lines.
- Six-Month Media Refresh: Every six months, pop the lid off your filter bucket. Take out the activated carbon bag, dump the old charcoal, and pack it with fresh granules. Rinse out any accumulated sludge at the bottom gravel layer, put it back together, and you are good to go for another half-year.
Common Mistakes to Avoid
Don’t fall into these common pitfalls that derail most urban irrigation systems:
- Relying Exclusively on Pure RO Water: Using straight reverse osmosis or distilled water strips away trace elements. Over time, your soil will deplete, forcing you to constantly calculate complex fertilizer ratios. Use filtered mineral-rich water instead.
- Using Overly Fine Filters Too Early: Installing a super-tight 5-micron drinking water filter at the start of an irrigation line will kill your water pressure and clog up every three days. Stick to a progressive layout ending in a standard 120-mesh screen.
- Skipping the Water Test: Spend a few dollars on a basic digital TDS (Total Dissolved Solids) and pH test pen kit. Knowing your baseline water profile helps you customize exactly how much mineral media you need to pack into your filter bucket.
- Compacting Your Filter Media: Do not jam or pack down your lava stones and charcoal bags forcefully into the bucket. It needs to remain loose and highly porous so gravity or low pressure can easily push water through the layout.
Environmental and Economic Wins
Building this system doesn’t just save your sanity—it’s a massive win for the planet and your wallet. By maximizing water distribution efficiency, you eliminate runoff waste, meaning every drop is directly absorbed by plant roots. Your irrigation equipment (tubing, fittings, and emitters) will last for years instead of ending up in a landfill every season due to mineral calcification.
Most importantly, you build a thriving, living soil biology that loves natural, chlorine-free, mineral-rich hydration, allowing you to cut back significantly on expensive synthetic bottled fertilizers. It’s cheap, sustainable, and the ultimate upgrade for any modern urban balcony garden.
Conclusion:
An efficient drip irrigation system is only possible with clean and healthy water that flows into it. However, while blocked emitters or mineral accumulation can cause problems, the solution lies in the installation of filters that do not eliminate the minerals that are necessary for plant growth.
A low-cost, easily installable high mineral content filter is one such solution. The elimination of sediments, rust, organic debris, excess chlorine, and retention of minerals ensure optimal water flow and healthy container gardening.
The design allows for flexibility of use with any water source like tap water, borewell water, rainwater, and harvested rooftop water. Coupled with proper maintenance techniques, this system can ensure smooth irrigation practices all season long.
Instead of always dealing with blocked emitters or making up for the lack of nutrients from water, focus can shift towards producing bountiful fruit from balcony gardening.