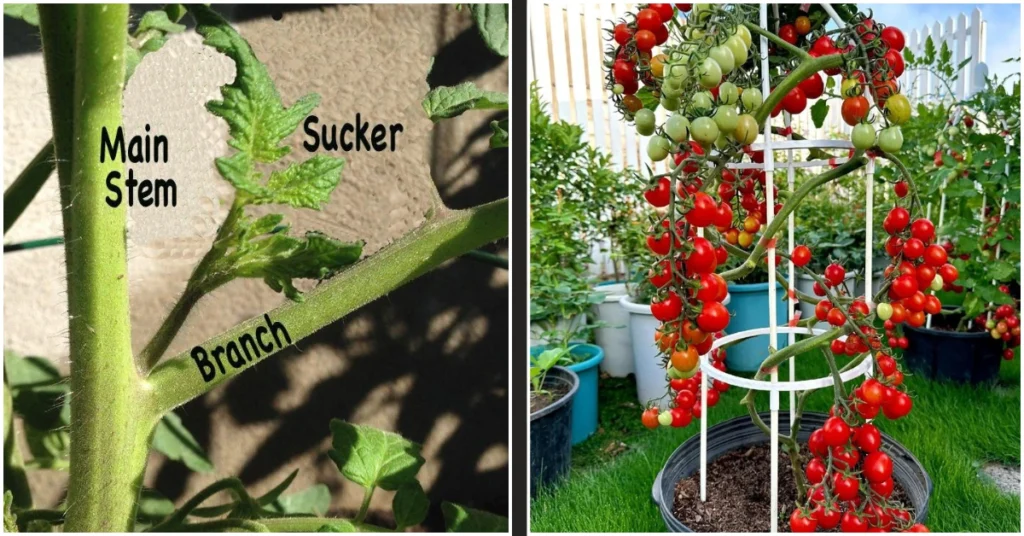
It might be time to let the sun do the heavy lifting if you’re continuously battling nematodes, weeds, and soil-borne illnesses. Using trapped solar heat to suppress pests and weed seeds, soil solarization is a straightforward, chemical-free gardening technique that helps produce healthier, more productive garden soil.
Even well-maintained beds can become less productive due to persistent weeds, soil-borne pests, and recurrent plant diseases.
Many gardeners look for a longer-lasting, natural solution that improves soil conditions before the next planting season, even though routine weeding and treatments may offer short-term relief.
Soil solarization is a well-established method that uses solar heat to manage nematodes, fungus, weed seeds, and other pests found in the soil. Both backyard farmers and commercial growers use this method extensively since it doesn’t require chemicals.
This guide explains how to solarize garden soil effectively, including the best time to do it, the science behind the process, and practical steps to achieve maximum results.
What I’ve Learned About Soil Solarization
Soil solarization is a natural gardening technique that uses the sun’s heat to raise soil temperatures high enough to kill or weaken:
- Weed seeds
- Existing weeds
- Harmful fungi
- Certain bacteria
- Soil-borne pests
- Nematodes
- Some insect larvae
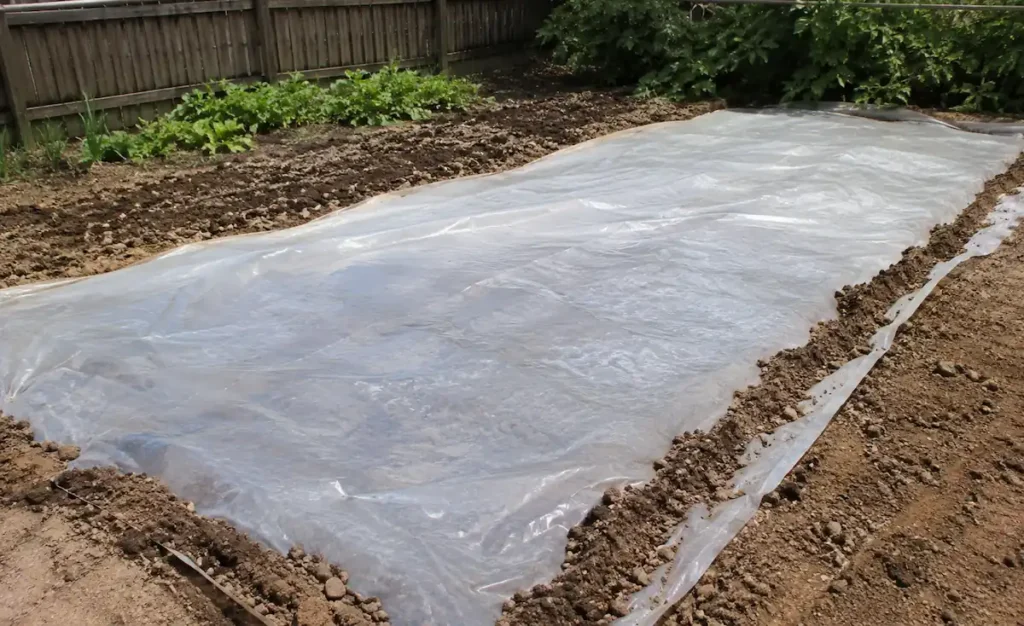
During the hottest part of the year, the procedure entails covering damp soil with clear plastic. A greenhouse effect is produced when sunlight penetrates the plastic and gets trapped beneath it.
Soil temperatures rise dramatically over a few weeks, frequently to the point where many weeds and pests cannot survive. In contrast to chemical treatments, solarization uses only solar energy and doesn’t need pesticides or herbicides.
Why I Recommend Soil Solarization to Fellow Gardeners
Natural techniques for managing weeds, pests, and plant diseases have grown in significance as more gardeners embrace sustainable growing methods.
Chemical herbicides may work in the short term, but they frequently don’t address the underlying problems that arise beneath the soil’s surface.
By utilizing solar heat to address common garden issues at their root, soil solarization offers a practical, chemical-free solution. It limits disease-causing organisms, inhibits the growth of weeds, lowers pest populations, and improves the environment for plant growth.
This technique is particularly useful in vegetable gardens, where many growers would rather keep synthetic products away from children, pets, and edible crops.
Solarization can promote stronger growth, healthier plants, and increased overall garden productivity by improving soil conditions prior to planting.
How Soil Solarization Works in the Garden
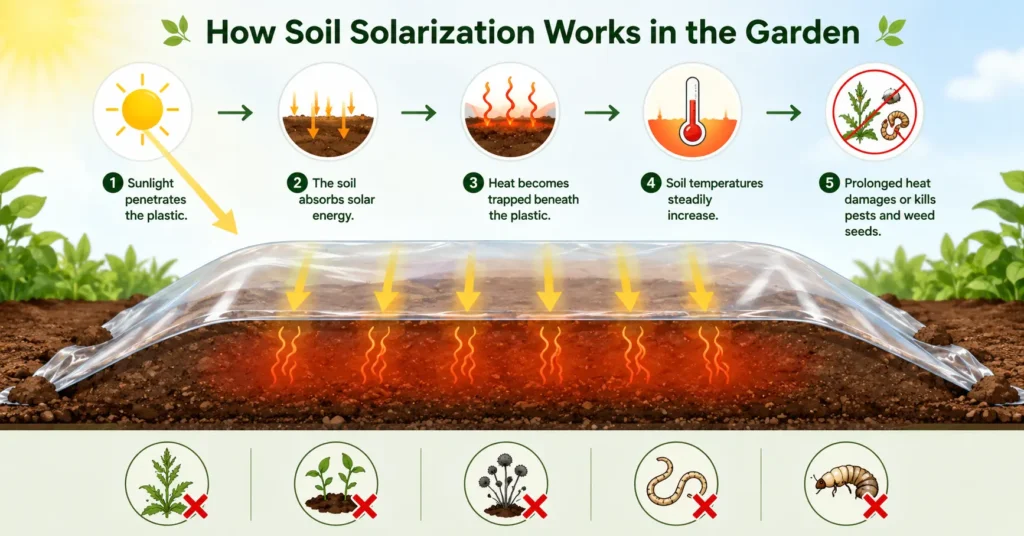
When clear plastic covers moist soil:
– Sunlight penetrates the plastic.
– The soil absorbs solar energy.
– Heat becomes trapped beneath the plastic.
– Soil temperatures steadily increase.
– Prolonged heat damages or kills pests and weed seeds.
By trapping solar heat under a layer of transparent plastic, soil solarization raises soil temperatures to a point where many pests and diseases cannot survive.
Solarized soil is very effective at solving common garden issues because it can reach temperatures between 110°F and 140°F (43°C and 60°C) under the right circumstances.
Many annual weed seeds are destroyed, emerging weeds are killed, disease-causing fungal pathogens are suppressed, nematode populations are decreased, and some soil-dwelling insects are eradicated.
By utilizing the sun’s energy to produce a healthier growing environment, soil solarization essentially functions as a natural soil pasteurization process.
The Benefits I’ve Seen From Solarizing Garden Soil
1. Natural Weed Control
Soil solarization significantly reduces weed pressure by exposing weed seeds and seedlings to prolonged high temperatures, causing many annual seeds to lose viability and existing weeds to die.
Common weeds affected include:
– Crabgrass
– Chickweed
– Pigweed
– Purslane
– Lamb’s quarters
– Annual bluegrass
Although deeply rooted perennial weeds may not be completely eliminated, soil solarization often weakens their root systems and significantly reduces future growth.
2. Reduced Soil-Borne Diseases
The development and persistence of numerous common plant diseases in the soil make long-term management challenging.
Fusarium wilt, Verticillium wilt, damping-off organisms, root rot fungi, and some bacterial diseases are among the dangerous pathogens whose populations are decreased by soil solarization.
Solarization encourages healthier root development and frequently produces stronger plants with fewer disease-related issues throughout the growing season by reducing disease pressure prior to planting.
3. How Soil Solarization Helps Control Nematodes
Vegetable gardens can be completely destroyed by root-knot nematodes. Plant roots are attacked by these microscopic pests, which lower productivity.
Because nematodes are extremely sensitive to high soil temperatures, solarization is especially effective.
After solarizing infected beds, many gardeners who are having trouble producing tomatoes, peppers, cucumbers, or melons noticeably improve.
4. Improved Plant Growth
A lesser-known benefit of soil solarization is improved plant growth and vigor. The increased soil temperatures can enhance nutrient availability by accelerating the breakdown of organic matter.
As decomposition occurs more efficiently, essential nutrients become easier for plant roots to absorb, supporting healthier development and stronger overall growth.
Gardeners often report:
- Faster growth
- Stronger root systems
- Better yields
- Improved overall plant vigor
5. Why I Consider Soil Solarization an Environmentally Friendly Option
Soil solarization requires no herbicides, pesticides, or synthetic chemicals, making it an environmentally friendly method for managing weeds, pests, and soil-borne diseases.
This makes it ideal for:
- Organic gardens
- Home vegetable plots
- School gardens
- Community gardens
- Pollinator-friendly landscapes
When Soil Solarization Works Best
The hottest and sunniest time of year is ideal for soil solarization because strong sunlight can raise soil temperatures to a point where weeds, pests, and disease-causing organisms are effectively suppressed.
June, July, and August are usually the best months in areas with warm climates.
Solarization works best in moderate climates between midsummer and late summer. Any prolonged period of intense sunlight and high temperatures can create ideal conditions for tropical and subtropical regions.
Select a time of year with long, sunny days, little to no cloud cover, high air temperatures, and little to no rainfall for optimal results. The soil can achieve and sustain the temperatures required for efficient treatment when there is constant heat.
One of the most crucial elements for success is timing, as hotter weather generally yields better solarization results.
Materials Needed for Soil Solarization
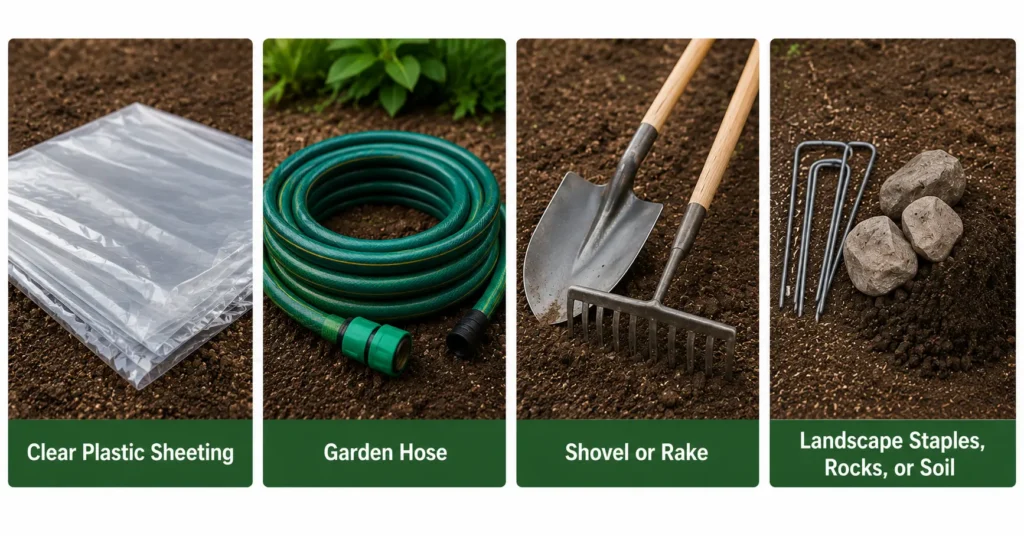
- Clear Plastic Sheeting- Use clear polyethylene plastic with a thickness of 1 to 4 mils. Clear plastic is more effective than black plastic because it allows sunlight to pass through while trapping heat in the soil.
- Garden Hose
- Shovel or Rake- For preparing and leveling the soil.
- Landscape Staples, Rocks, or Soil- Used to secure the edges of the plastic.
How I Solarize Garden Soil Naturally: A Step-by-Step Process
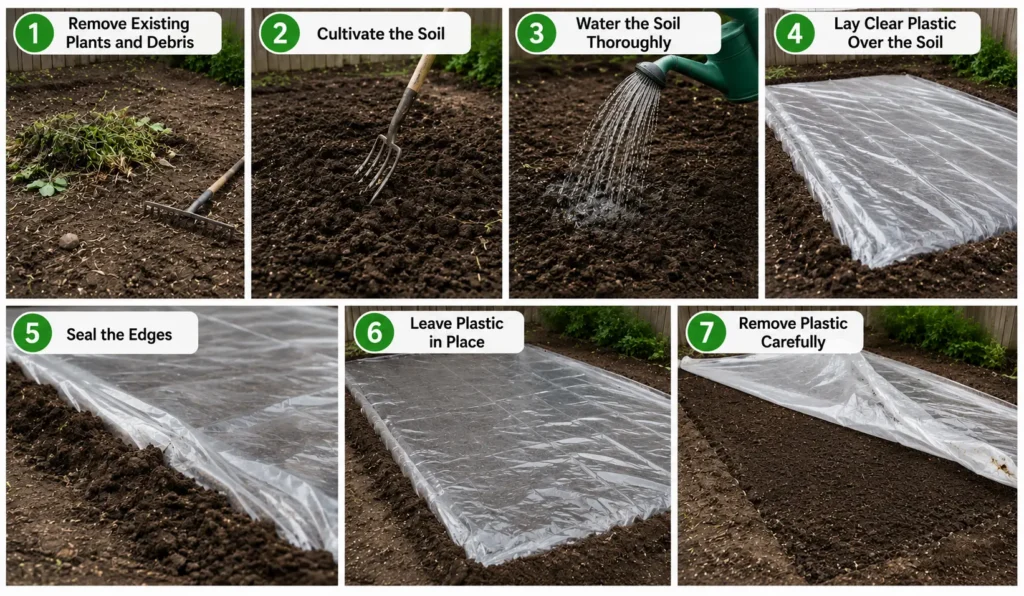
Step 1: Remove Existing Plants and Debris- Clearing the planting area should come first. To create a smooth surface, remove rocks, large roots, mulch, weeds, and plant debris. This guarantees improved soil-plastic contact, enhancing heat retention and solarization efficiency.
Step 2: Cultivate the Soil- Loosen the top layer of soil using a garden fork, rototiller, or shovel. Break apart large soil clumps and level the surface to promote more uniform heat penetration throughout the treatment area.
Step 3: Water the Soil Thoroughly- Proper soil moisture is essential for effective solarization. Thoroughly water the area so moisture reaches several inches below the surface. The soil should remain evenly damp, not waterlogged, as moist soil transfers heat more efficiently than dry soil.
Step 4: Lay Clear Plastic Over the Soil- Avoid creating air pockets by tightly stretching the clear plastic over the prepared soil. Throughout the solarization process, keeping the plastic in close proximity to the soil enhances heat transfer and aids in more efficient solar energy retention.
Step 5: Seal the Edges- Use soil to bury the edges of the plastic or use bricks, rocks, or landscape staples to anchor it.
The efficiency of soil solarization is greatly increased by a tight seal, which also stops heat loss and lessens wind disturbance.
Step 6: Leave Plastic in Place
Patience is important for successful soil solarization. Keep the plastic in place for a minimum of four weeks, although six to eight weeks is generally recommended for better weed and pest suppression. In areas with severe infestations, extending the treatment period to eight to ten weeks can provide more effective results.
Step 7: Remove Plastic Carefully- After the solarization process is finished, carefully remove the plastic. Deep cultivation should be avoided afterward because disturbing the soil can promote the growth of new weeds by bringing dormant weed seeds to the surface.
Instead:
- Plant directly
- Use shallow cultivation only
- Apply mulch if needed
Common Mistakes That Reduce Solarization Success
Using Black Plastic- Since clear plastic typically raises soil temperatures more effectively, using black plastic instead is a common mistake that can reduce the success of soil solarization.
Solarizing During Cool Weather- Because solarization depends on continuous heat, conducting it during cool or mild weather may limit its effectiveness and reduce pest and weed control.
Leaving the Soil Dry- Keeping the soil dry before and during treatment is another error, as moisture improves both heat transfer and the overall efficacy of solarization.
Poorly Sealed Plastic Edges- Heat can escape through poorly sealed edges of the plastic cover. To maintain high soil temperatures, the edges should be carefully fastened and sealed.
Removing Plastic Too Soon- Removing the plastic before the recommended treatment period may result in inadequate suppression of pests and weeds. While the minimum duration is usually four weeks, leaving the plastic in place for six to eight weeks often produces much better results.
What Weeds Can Soil Solarization Control?
Examples include:
– Pigweed
– Chickweed
– Purslane
– Foxtail
– Goosegrass
– Crabgrass
– Knotweed
Can Solarization Kill Perennial Weeds?
Perennial weeds can be partially controlled by soil solarization, but it is frequently more difficult to eradicate species with deep or extensive root systems. Johnson grass, Bermuda grass, bindweed, and nutsedge are typical examples.
Solarization can considerably slow the growth and spread of these tenacious weeds, even though it might not completely eradicate them. Frequent solarization treatments frequently enhance overall efficacy and long-term control.
Soil Solarization vs. Chemical Weed Killers: What I’ve Found Works Best
Soil Solarization
Pros:
- Natural method
- Improves soil health
- Controls pests and diseases
- No chemical residues
- Long-term benefits
Cons:
- Requires hot weather
- Takes several weeks
- Not instant
Chemical Herbicides
Pros:
- Fast results
- Easy application
Cons:
- Temporary control
- Potential environmental concerns
- May not affect soil pathogens
- Can require repeated applications
Real Garden Example: My Tomato Bed Recovery
Several years ago, one of my raised garden beds had become increasingly difficult to manage due to persistent weeds, root-knot nematodes, and poor tomato growth.
To address these issues, I solarized the bed during July, leaving the plastic in place for approximately seven weeks during the hottest part of the summer.
The following spring, the improvement was immediately noticeable. Tomato plants established more quickly and showed stronger overall growth.
The plants developed healthier root systems, produced larger harvests, and experienced fewer disease problems throughout the season.
Although soil solarization was not a complete solution to every issue, it significantly improved the growing conditions and helped restore the productivity of the bed.
Also Read: Why Balcony Vegetable Plants Struggle Near AC Outdoor Units (And How to Protect Them)