Frequent travel doesn’t have to mean a dead kitchen garden. Using nothing but old bottles, cotton rope, and clay pots, you can build a self-watering setup that keeps tomatoes, chillies, and herbs alive for weeks — no gadgets, no daily watering, just smart Indian gardening solutions that actually work.
Last September I came back from an 11-day trip to Coimbatore (Tamil Nadu) and found half my terrace tomatoes wilted flat against their pots, the coriander gone yellow, and my curry leaf sapling looking like it had given up on life entirely.
That trip cost me almost two months of growing time. What fixed it wasn’t a fancy irrigation kit or an expensive app-controlled drip system — it was four self-watering setups I built using things already lying around my house: old ghee tins, cotton rope, plastic bottles, and a broken bucket.
If you travel often and keep losing your kitchen garden every time you’re away, this guide will show you exactly how Indian home gardeners are solving this problem without spending on imported gadgets.
Why Kitchen Gardens in India Struggle the Most When You Travel
A reliable watering system isn’t optional if you live in most Indian cities — it’s a survival tool for your plants. Here’s why our climate makes this worse than what you’ll read in Western gardening blogs.
In Chennai, Nagpur, or Ahmedabad summers, terrace pots can lose moisture within 24 hours because unglazed clay pots and black plastic containers heat up fast under direct sun.
A single missed watering day in May or June can be fatal for shallow-rooted crops like coriander, spinach, or mint. Compare this to a Bangalore or Pune balcony garden, where cooler temperatures and higher humidity give you 3-4 days of buffer — the same irrigation method will behave completely differently depending on which Indian city you’re gardening in.
Then there’s the monsoon problem nobody talks about. If you travel during July-August, overwatering from unexpected heavy rain combined with a watering system that isn’t monsoon-adjusted can drown root systems just as badly as underwatering does in summer.
So the first thing any experienced kitchen gardener will tell you is: the season you’re travelling in decides which method you should use, not just the number of days you’re away.
Know Your Plants’ Water Behaviour Before You Build Anything
Before jumping into a self-watering setup, spend one evening actually studying what’s growing in your kitchen garden. This step gets skipped constantly, and it’s the reason most DIY watering hacks fail within three days.
Group your pots into three categories:
High-thirst plants — tomato, chilli, brinjal, cucumber, and any leafy green like spinach or amaranth (chaulai). These need moisture-retentive systems and can’t survive more than 2 days dry in peak summer.
Medium-thirst plants — coriander, mint (pudina), fenugreek (methi), and most flowering ornamentals. These do reasonably well with a basic wick-based watering method.
Low-thirst, hardy plants — curry leaf, tulsi, aloe vera, lemongrass, and most succulents. Honestly, these barely need any special irrigation trick at all if you’re gone under a week — they’re built to handle neglect.
Once you know which category dominates your balcony or terrace, you’ll pick the right method instead of applying one system to everything, which is where most people go wrong.
Method 1: The Terracotta Olla (Buried Clay Pot Irrigation)
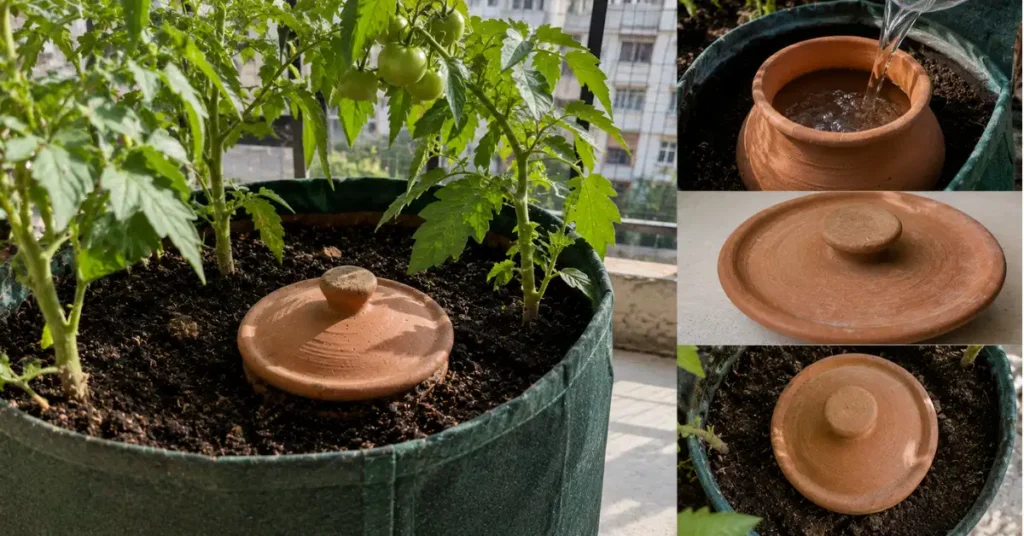
This is the oldest DIY watering trick in Indian farming history, used by farmers in Rajasthan and Maharashtra long before drip irrigation existed, and it still outperforms most modern gadgets for kitchen gardens. In fact, traditional pitcher irrigation research demonstrates that buried porous clay pots can reduce water consumption by up to 70% compared to surface watering.
What you need:
- An old unglazed matka or small terracotta pot with a lid (or a saucer to cover it)
- A cork, cloth, or mud to plug the drainage hole if there is one
How to build this watering system:
- Take a small matka, plug any drainage hole at the bottom with a piece of cloth dipped in wet mud, and let it dry for a day.
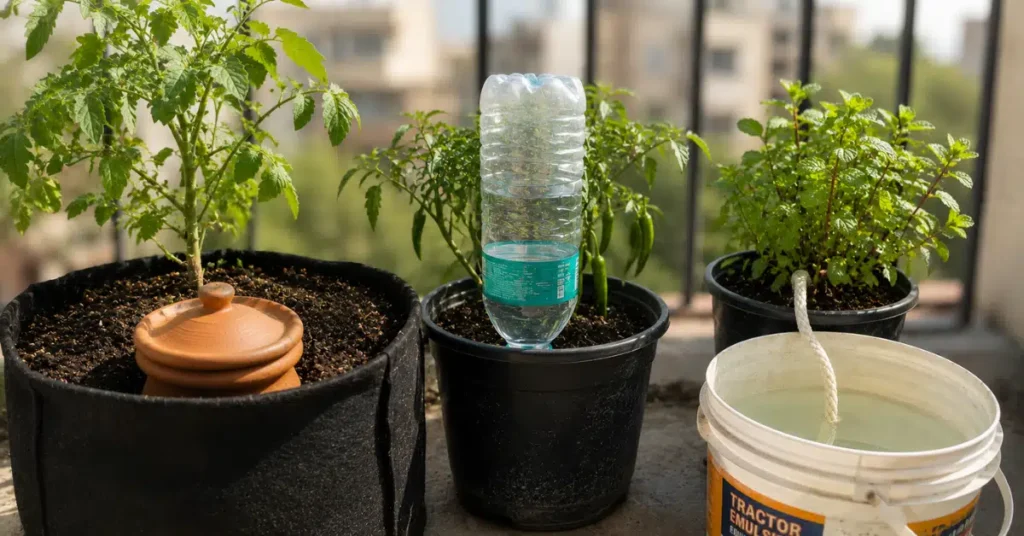
- Bury the matka up to its neck in the centre of your grow bag or large pot, surrounded by your plants.
- Fill the matka completely with water and cover the top with a lid, tile, or small plate to stop evaporation and mosquito breeding.
- Water seeps slowly through the porous clay walls directly to the root zone, based on how dry the surrounding soil is — this is why it’s a self-regulating irrigation method, releasing more water when soil is drier and less when soil is moist.
A medium matka holding roughly 3 litres can keep 3-4 tomato or chilli plants hydrated for 6-8 days depending on pot size and season. This method genuinely mimics what your hand would do daily, minus the daily part.
Best for: Grow bags, raised beds, and large mixed pots with 3+ plants clustered together.
Method 2: The Inverted Bottle Drip Method
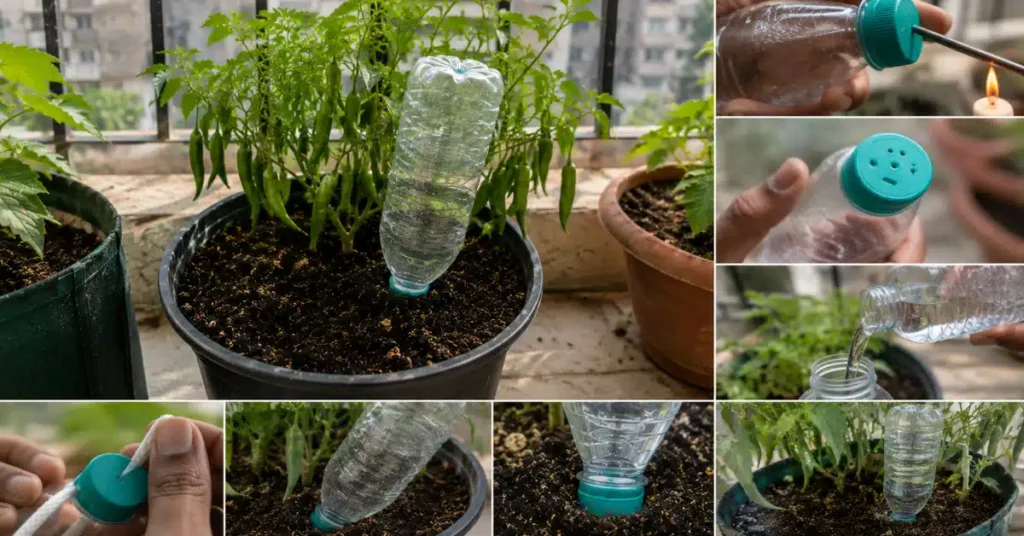
This is probably the most popular DIY watering trick shared in Indian gardening groups, and for good reason — it costs nothing and takes ten minutes per pot.
What you need:
- Used 500ml or 1-litre plastic water bottles (one per pot)
- A thin nail or safety pin heated on a flame
- Cotton cloth strip (optional, for slow-release control)
Step-by-step guide:
- Wash the bottle and remove the label so algae doesn’t build up inside from sunlight.
- Heat a nail and puncture 2-3 tiny holes near the bottle cap, or alternatively drill one hole and thread a cotton wick through it for slower, more controlled dripping.
- Fill the bottle fully with water, close the cap loosely (this controls drip speed — tighter cap means slower drip).
- Dig the bottle neck-down into the soil about 2-3 inches deep, angled slightly, positioned close to the root zone but not touching the main stem.
- Fill and reset the bottle before you leave — a 1-litre bottle typically lasts 4-6 days for a single medium pot in normal weather, less in peak summer heat.
For a longer trip, use 2-litre bottles instead, or connect two bottles per pot using a T-joint from an old plastic pipe if you have one lying around.
Pro tip from experience: don’t use bottles with very large holes — I made this mistake early on and my entire bottle rig emptied out in six hours instead of six days. Small holes with a snug cap are what make this work.
Method 3: Cotton Wick Irrigation Using a Water Reservoir
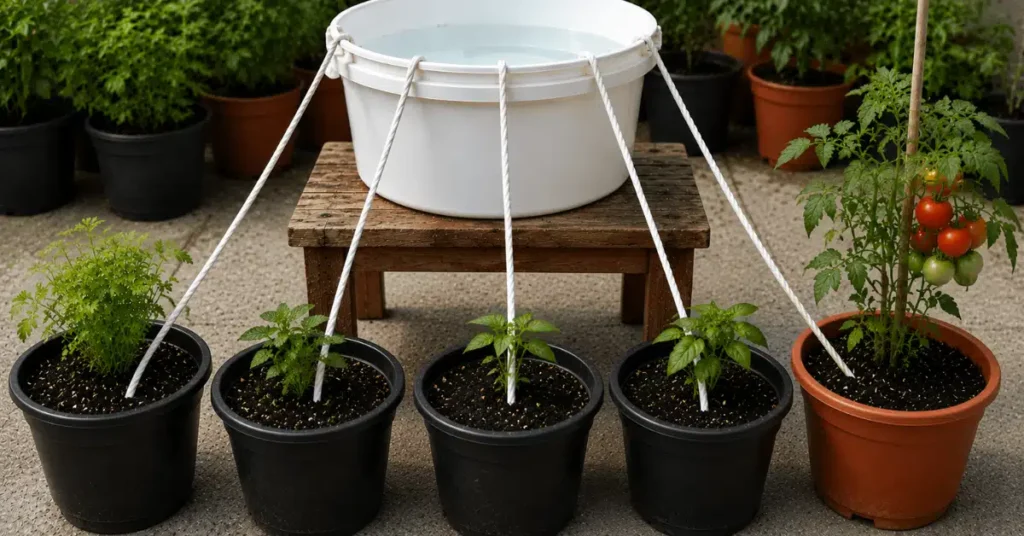
If you have several small pots — herbs, seedlings, or a windowsill garden — this irrigation setup is the most reliable one I’ve used, and it’s borrowed directly from nursery propagation techniques.
What you need:
- A bucket, large steel vessel, or plastic tub as a water reservoir
- Thick cotton rope or old cotton bedsheet strips (nylon doesn’t wick water well, avoid it)
- A stool, table, or raised platform
How this method works:
- Place your water reservoir on a raised stool or table.
- Arrange your pots around and slightly below the reservoir on the floor or a lower shelf.
- Cut cotton rope strips about 12-18 inches long, soak them in water first, and insert one end deep into the reservoir, letting the other end sit inside the soil of each pot, buried 2 inches deep near the roots.
- Water is drawn up through capillary action, exactly like a candle wick pulling wax, and this arrangement will supply moisture continuously as long as the reservoir has water.
A 15-litre bucket can typically run 6-8 small pots for 10-12 days without refilling, making this the best option for longer trips like a week-long family function or a work posting.
Best for: Herb gardens, seedling trays, coriander and mint pots, windowsill setups.
Method 4: The Bathtub or Tray Wicking Bed
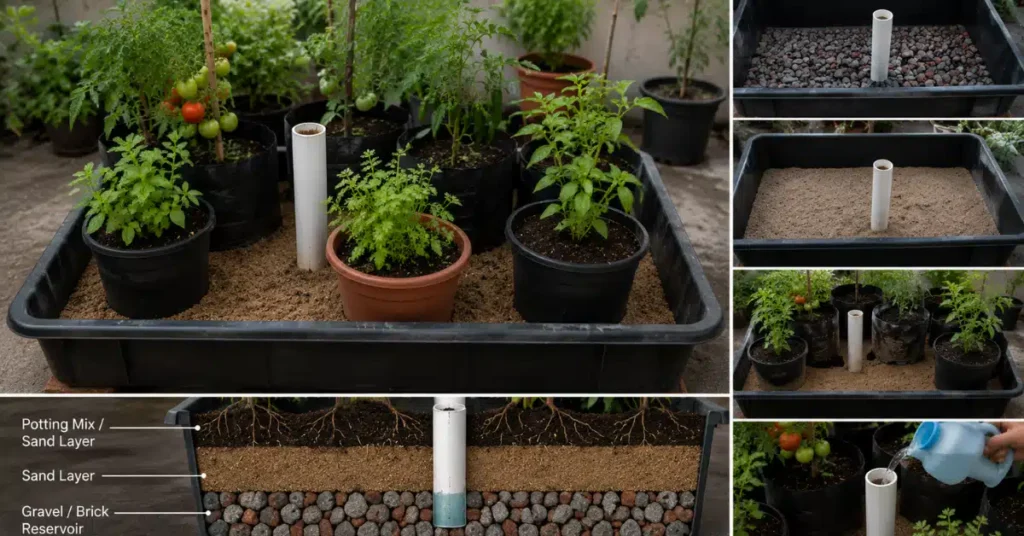
For gardeners with a larger terrace and grow bags rather than individual pots, this self-watering setup is essentially a mini wicking bed — a sub-irrigation technique adapted from modern horticultural propagation. It operates on the same capillary principles recommended in the TNAU Agritech Portal micro-irrigation guidelines to deliver water directly to the root zone without surface evaporation.
What you need:
- A large plastic tray, old bathtub, or a cut-open water drum
- Sand or coco peat
- A few bricks or gravel for drainage layer
Building this system:
- Place a 2-inch layer of gravel or broken bricks at the bottom of the tray for water storage space.
- Add a layer of coarse sand on top, then place your grow bags or pots directly onto this layer (or fill the entire tray with potting mix if you’re growing directly in it).
- Insert a length of PVC pipe vertically into the gravel layer, sticking a few inches above the soil, so you can pour water directly to the reservoir below.
- Fill this pipe with water before leaving — the water sits in the gravel layer and wicks upward into the sand and root zone as the soil dries out.
This wicking bed can sustain an entire terrace of 8-10 pots for 10-15 days, making it ideal for people who travel for work every 2-3 weeks and don’t want to rebuild a system each time.
Choosing the Right Watering Method Based on How Long You’re Travelling
Not every method suits every trip length. Here’s how I match systems to duration, based on what’s actually worked on my own terrace over the years.
Weekend trips (1-3 days): Honestly, most Indian summer mornings you can skip a special setup entirely and just water deeply before leaving, especially for hardy plants like tulsi, curry leaf, and succulents. For high-thirst plants, a basic bottle drip rig is more than enough.
Short trips (4-7 days): This is where a bottle drip or terracotta olla method earns its keep. Combine both — olla for grow bags with multiple plants, bottles for individual pots.
Medium trips (8-14 days): Cotton wick irrigation is your best bet here. It’s the most consistent method for this duration and works well even if temperatures fluctuate while you’re away.
Long trips (15-30 days): You need the bathtub or tray wicking bed, possibly combined with wick irrigation for smaller pots. At this duration, also consider asking a neighbour to top up the reservoir once mid-trip as a backup, since no unattended system should be trusted completely for a full month in Indian heat.
Pre-Travel Checklist for Your Kitchen Garden
Print this or save it — I use a version of this exact checklist before every trip:
- Water all pots deeply 24 hours before leaving, not right before you leave (lets excess water drain out first)
- Move pots away from direct afternoon sun if possible, into a partially shaded corner
- Remove any flowering stalks or unripe fruit that will demand extra energy and water from the plant
- Trim back leggy growth on herbs like mint and coriander to reduce water loss through leaves
- Check your self-watering setup a full day before departure, not the morning of, so you can fix leaks or blockages
- Group pots together rather than spreading them out — this raises humidity around the cluster and slows drying
- Mulch the topsoil with dry leaves, coco peat, or newspaper to cut down evaporation significantly
- Inform a neighbour or building watchman with a spare key if the trip crosses 15 days, even with a solid watering system in place
- Label each bottle or reservoir with the date filled, so you know exactly when it’ll run dry
- Take a “before” photo of your garden — genuinely useful for spotting what changed when you return
Common Mistakes Indian Gardeners Make With DIY Watering Systems
I’ve made most of these myself, so take this as field experience rather than theory.
Using too large a drip hole. A bottle rig with an oversized hole empties in hours, not days. Always test your setup 24 hours before leaving to see the actual drip rate.
Placing pots in full sun expecting the system to compensate. No wick or bottle method can keep up with direct 40°C Delhi or Nagpur summer sun on a black plastic pot. Shade first, then set up watering.
Forgetting the monsoon adjustment. If you’re travelling during the rains, a method designed for dry season will overwater your plants along with the rainfall itself, leading to root rot. Reduce reservoir size or skip the setup entirely if heavy rain is forecasted.
Ignoring pot drainage. Every irrigation method assumes your pots drain properly. If your saucers are holding standing water already, fix drainage before adding any watering system, or you’ll drown the roots instead of saving them.
Using chlorinated tap water directly in wick systems left standing for weeks. Let water sit for a few hours before filling long-duration reservoirs; this reduces chlorine buildup that can affect sensitive herbs like coriander over extended periods.
Reviving Your Kitchen Garden After You Return
Even the best watering system sometimes leaves plants a little stressed by the time you’re back. Here’s the recovery routine I follow:
- Don’t flood them immediately. Give a moderate watering first, wait 2-3 hours, then assess which pots need more.
- Check the roots, not just the leaves. Wilted leaves often recover within 24-48 hours if roots are intact; yellowing with soft, mushy stems usually means overwatering from the system and needs immediate drainage correction.
- Prune dead or yellow growth to redirect the plant’s energy toward new shoots rather than maintaining damaged leaves.
- Move pots back to their ideal light gradually rather than shifting from shade straight to harsh sun, which can shock recovering plants.
- Feed lightly with diluted compost tea or a mild organic feed about 3-4 days after return, once the plant shows fresh growth, not immediately.
Most plants that survived your time away will bounce back within a week. The ones that don’t were usually already struggling before you left, which is exactly why the pre-travel checklist matters as much as the watering method itself.
Maintaining Your DIY Watering System for Repeat Trips
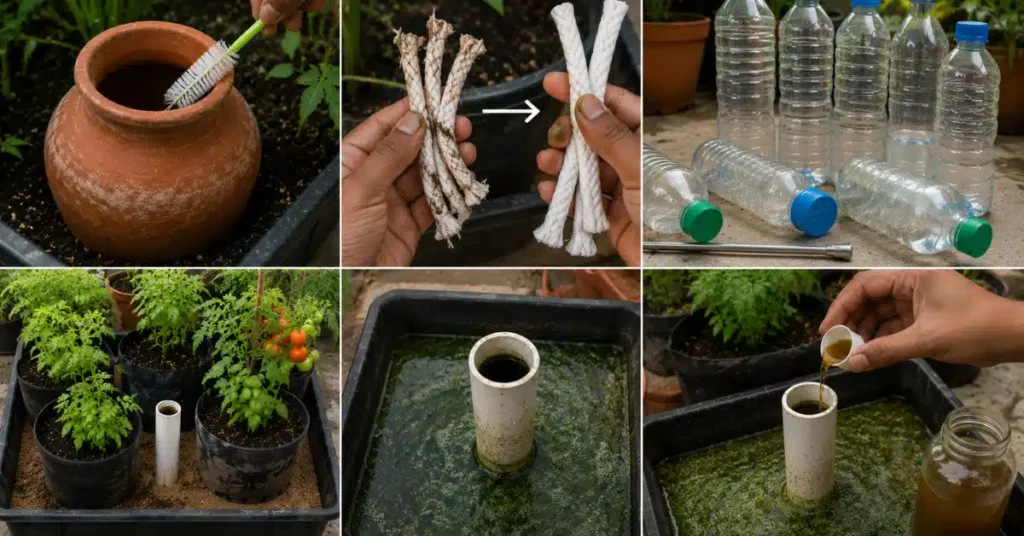
If you travel frequently, don’t rebuild your setup from scratch every single time — maintain it as permanent garden infrastructure.
- Clean terracotta ollas every 2-3 months since mineral deposits from tap water can clog the porous clay over time, reducing how well it releases moisture.
- Replace cotton wicks every couple of months, since they degrade and their wicking efficiency drops, weakening the whole arrangement’s consistency.
- Keep a dedicated set of bottles just for this purpose so your rig is always ready to fill and deploy within minutes before a sudden work trip.
- Check reservoir containers for algae growth if you’re running the wicking bed continuously — a capful of diluted neem oil in the water keeps this in check without harming plants.
This same hard water residue can affect the plants themselves over time, not just your pots. If you’re noticing white crust on rims or slower growth despite regular watering, here’s how hard water damages indoor plants and how to fix it.
Cost Comparison: What Each Method Actually Costs You
One question I get asked constantly on Instagram is whether these DIY methods are actually cheaper than buying a ready-made self-watering setup from a nursery or online store.
Here’s an honest breakdown based on what I’ve spent building and running each system over the years.
| Method | Materials Needed | Approximate Cost | Lifespan |
| Bottle drip method | Used bottles, nail | ₹0 (recycled items) | 6-8 months per bottle |
| Terracotta olla | Small matka | ₹40-80 per matka | 2-3 years with cleaning |
| Cotton wick reservoir | Bucket, cotton rope | ₹150-300 one-time | Rope replaced every 2-3 months |
| Tray wicking bed | Tray, gravel, PVC pipe | ₹400-700 one-time | 3-5 years |
Compare this to store-bought self-watering pots or drip irrigation kits, which start around ₹800-1500 for a basic setup and go up quickly for anything covering more than 4-5 pots.
For most balcony and terrace gardeners, a homemade watering system does the same job at a fraction of the price, and honestly performs better because you can adjust it to your exact pot sizes and plant types instead of working around a fixed manufactured design.
Disclaimer: Prices mentioned above are approximate market estimates based on general availability in Indian cities and may vary by location, season, or vendor. This article is not sponsored, and I have no affiliation, partnership, or commercial tie-up with any brand, nursery, or online store mentioned or implied here — every method and cost figure comes purely from personal experience.
City-Wise Climate Considerations for Your Watering Plan
India isn’t one climate, and neither should your approach be a one-size-fits-all decision. Based on conversations with fellow gardeners across different cities, here’s how conditions change your strategy.
Delhi, Jaipur, Nagpur (extreme dry heat, 40°C+ summers): Your system needs the largest possible reservoir relative to pot size. Based on India Meteorological Department (IMD) weather data, summer surface evaporation rates in these inland regions can dry out unshaded topsoil within hours, so prioritize wick irrigation or the wicking bed method.
Mumbai, Chennai, Kolkata (humid coastal climates): Humidity slows evaporation naturally, so a smaller reservoir goes further. The bigger risk here is fungal growth from excess moisture, so avoid over-filling, especially during monsoon months.
Bangalore, Pune, Hyderabad (moderate climate): These cities are honestly the easiest for any DIY method to succeed in. Moderate temperatures mean even a basic bottle drip rig can comfortably last a week without much monitoring.
Coastal Kerala, Goa, coastal Karnataka (high humidity, heavy monsoon): Focus less on elaborate watering rigs during June-September and more on drainage and airflow, since overwatering is the bigger threat than underwatering in this window.
Troubleshooting Your Watering System
Even a well-built setup can go wrong. Here’s how to diagnose and fix the most common issues before you leave, so you’re not troubleshooting from a hotel room 500 kilometres away.
Water isn’t dripping at all from the bottle rig: The hole may have sealed itself due to soil clogging the opening. Reopen it slightly with a toothpick and test again before leaving. Sometimes the cap is simply too tight — loosen it a quarter turn.
The terracotta olla is emptying too fast: This usually means the clay is more porous than expected, or the surrounding soil is unusually sandy and draining fast. Add a layer of mulch around the buried olla to slow evaporation and give the system more control.
Cotton wicks aren’t drawing water properly: Wicks that have dried out completely lose their capillary action temporarily. Always pre-soak wicks in water for at least 10 minutes before installing them, and make sure one end sits fully submerged in the reservoir, not just resting on the surface.
Water in the wicking bed isn’t reaching the topsoil: Check that your sand layer isn’t too compacted, and that the gravel drainage layer beneath it isn’t clogged with soil that’s washed down. A thin layer of old cloth or coconut coir between gravel and sand prevents this mixing issue in future builds.
Algae or mosquito larvae in the reservoir: Always keep reservoirs covered with a lid, mesh, or cloth. A few drops of neem oil in standing water disrupts mosquito breeding without harming your plants or the setup’s function.
Why This Approach Works: Learning From Traditional Indian Farming
Long before anyone talked about a “self-watering setup” as a trending gardening term, Indian farmers were solving this exact problem.
Olla irrigation using buried clay pots has been documented in dryland farming practices across Rajasthan and parts of Maharashtra for generations, precisely because it conserves water while keeping crops alive through dry spells.
Wick irrigation, similarly, borrows directly from nursery propagation techniques used by professional growers to keep thousands of seedlings hydrated without daily manual watering.
What I’ve done across these methods is scale down farming-proven techniques into something that fits a Mumbai balcony, a Bangalore terrace, or a Delhi kitchen windowsill.
That’s really the whole philosophy behind good travel-friendly watering for home gardeners — you’re not inventing something new, you’re adapting old, tested wisdom to a smaller, urban scale using whatever’s already sitting in your kitchen or store room.
Quick Reference: Matching Your System to Your Situation
For readers who just want the short version before scrolling back up for details, here’s a quick-glance summary of everything covered above.
| Trip Duration | Recommended Self-Watering Setup | Ideal For |
| 1-3 days | Deep watering only, or basic bottle drip | Hardy plants, tulsi, curry leaf |
| 4-7 days | Bottle drip or terracotta olla | Grow bags, individual pots |
| 8-14 days | Cotton wick reservoir | Herb clusters, seedling trays |
| 15-30 days | Tray wicking bed + wick backup | Full terrace setups, mixed pots |
Keep this table bookmarked, because the right watering method genuinely changes with every trip you take — a quick weekend visit to your parents’ place needs a completely different approach than a three-week posting abroad.
Once you’ve built two or three of these systems and used them a few times, choosing and assembling the right setup before a trip takes less than 15 minutes, which is honestly less time than most people spend deciding what to pack.
A Note on Experience Behind This Guide
I’ve been growing vegetables and herbs on my own terrace and balcony for over six years now, across two different Indian cities with very different climates, and travel for work roughly once a month.
Every method described here has gone through actual trial and error on my own plants — including the failures, like the summer I lost an entire batch of brinjal seedlings to a badly-sized bottle drip rig before I figured out the right hole size.
Nothing in this guide is copied from a manual; it comes from repeated, hands-on testing across real Indian growing conditions, adjusted specifically for readers dealing with our heat, our monsoon, and our very particular mix of balcony and terrace gardening spaces.
Final Thoughts From My Own Terrace
None of these methods need you to spend money on imported irrigation kits sold online for exaggerated prices.
Every technique here has been tested through actual travel — work trips, family functions, and one memorable 18-day Kerala vacation where my wicking bed kept an entire terrace of chillies and tomatoes alive without a single visit from anyone.
The real secret isn’t the gadget, it’s matching the right self-watering setup to your plants, your trip length, and the Indian season you’re travelling in.
Start with whichever method matches your next trip, and adjust from there — your kitchen garden will forgive a lot more neglect than you think, as long as it isn’t going completely thirsty.

FAQs
Which self-watering setup is best for a 10-day trip in Indian summer?
Cotton wick irrigation using a raised bucket reservoir handles 10-day trips most reliably in summer conditions, especially when combined with mulching and shade repositioning before you leave.
Can I use this method for a terrace garden with 20+ pots?
Yes, though at that scale it’s more efficient to build one central wicking bed for grouped grow bags rather than 20 individual bottle rigs, which becomes hard to monitor and refill.
Will a DIY watering system work during monsoon travel?
It can, but reduce reservoir size and monitor the weather forecast — heavy rain plus an active setup can lead to overwatering. Some gardeners simply disconnect the system if rain is expected for most of the trip.
How much water does a typical setup use per week?
This varies by method and pot size, but as a rough guide, a bottle drip rig uses roughly 1-2 litres per pot per week, while a wick reservoir uses 10-15 litres for 6-8 pots over the same period.
Is terracotta olla irrigation better than the bottle method?
Both work well, but ollas suit grow bags with multiple plants clustered together, while bottles work better for standalone pots. Many experienced gardeners use both, matched to the pot type.